
Getting Started: Setting up and Managing your Server
An Introduction to Linux Server Administration in 2023
In the world of IT, Linux servers play a vital role in powering web servers, databases, and various other applications. As a Linux server administrator, you will be responsible for maintaining the health and security of your servers, as well as ensuring their performance is optimized.
Linux server administration is an essential skill for IT professionals who want to manage and maintain their servers. In this article, we will introduce you to the basics of Linux server administration, including setting up and managing your server, as well as some important protocols and techniques.

Getting Started: Setting up a Linux Server The first step in setting up a Linux server is to choose the right operating system
There are several popular distributions of Linux, including Ubuntu, CentOS, and Red Hat Enterprise Linux, to name a few. Each distribution has its own strengths and weaknesses, so it is important to choose the right one for your needs.
Contents
- Initial Setup
- Basics of managing your Linux Server
- Managing your Linux server in Google Cloud Console in 2023
- WordPress | Google Cloud | https://cloud.google.com › wordpress
- Quick Setup guide for cloud VM in google cloud console – WordPress:
- Unlocking the Power of Google Cloud Console for Your WordPress Site: Managing Your Linux Server
- Managing your Linux Server
- Connecting to your server
- Restarting Your Server
- Managing User Account Control for Linux Server Admins
- Managing User Accounts in Linux
- Managing User Groups in Linux
- Maximizing Website Performance with Google Cloud Console: A Beginner’s Guide to Event Logs, Agents and Observability Tool
- Event Logs
- Agents
- Observability Tools
- Troubleshooting
Initial Setup
The first step in setting up a Linux server is to choose a distribution that best fits your needs. Some popular distributions include Ubuntu, Debian, and Red Hat. Once you have chosen a distribution, you can proceed with the installation process.
The next step is to install it on your server. This can be done either by using a bootable CD or by downloading the installation image from the Internet and installing it on your server.
After installation, it is important to secure your server by implementing best practices such as setting up a firewall and disabling unnecessary services. You should also keep your server updated by regularly applying security patches and updates.
It is important to configure your server with the right settings, such as the IP address, hostname, and firewall. This can be done through the command line interface or through a web-based graphical interface.
Basics of managing your Linux Server
Once your server is set up and configured, it is time to start managing it. This includes tasks such as updating software packages, monitoring the system performance, and managing user accounts.
One of the key tools for managing your server is the package manager. This allows you to install, update, and remove software packages on your server. For example, on Ubuntu, you can use the apt-get command to install, update, and remove packages.
Monitoring system performance is also an important part of managing your server. This can be done using tools such as top and htop, which allow you to see the system load, memory usage, and other key metrics. Depending upon your type of install, there are different types of monitoring and logging available for you.
Managing your Linux server in Google Cloud Console in 2023
The Google Cloud Console: computer engine has many advanced features available to help administrators and developers manage their Linux instances.
What is Google Cloud Console?
Google Cloud Console is a web-based platform that allows you to manage your cloud resources and services. It is designed to be user-friendly and provides a centralized control panel for managing your virtual machines (VMs), storage, and network settings.
TheITApprentice.com’s website runs on a Google Cloud server, in this blog post we will be sharing our personal experience setting our site up – as well as diving into all of of the features we have needed to understand, setup and configure.
Managing your Linux server in Google Cloud Console for Debian Linux can be a complex task. However, with the right tools and knowledge, it can be a breeze. In this article, we will explore the steps involved in setting up and managing your Linux server for Debian Linux using Google Cloud Console.
WordPress | Google Cloud | https://cloud.google.com › wordpress
Deploy your WordPress website on Google Cloud services in minutes. Google Cloud handles the setup and configuration, so you can focus on your website.
Quick Setup guide for cloud VM in google cloud console – WordPress:
Step 1: Setting up your server The first step is to set up your server in Google Cloud Console. To do this, you need to create a Google Cloud account and sign in. Then, you can create a new project and select “Compute Engine.” This will give you access to a virtual machine (VM) instance, which will serve as your Linux server.
Step 2: Installing Debian Linux Once you have set up your server, you can now install Debian Linux. You can do this by selecting the “Create” button and selecting “Debian” as your operating system. You can also configure your server by selecting the appropriate machine type, disk size, and firewall rules.
Step 3: Setting up the firewall To secure your server, you need to set up a firewall. In Google Cloud Console, you can do this by selecting the “Firewall rules” option. From there, you can configure the firewall rules to allow or block incoming and outgoing traffic. You can also create rules for specific IP addresses or ports.
Step 4: Installing WordPress With your server set up and secured, you can now install WordPress. This is a popular content management system (CMS) that is used to build and manage websites. To install WordPress, you will need to log into your server using SSH. Once logged in, you can use the apt-get command to install WordPress and its dependencies.
Step 5: Configuring WordPress With WordPress installed, you can now configure it to your liking. This includes setting up the database, configuring plugins, and customizing the themes. You can do this through the WordPress dashboard, which you can access through your browser.
In conclusion, managing your Linux server in Google Cloud Console for Debian Linux is a simple process. With the right tools and knowledge, you can set up and manage your server with ease. Whether you are a beginner or an experienced Linux administrator, this guide will help you get started and manage your server with confidence.
Unlocking the Power of Google Cloud Console for Your WordPress Site: Managing Your Linux Server
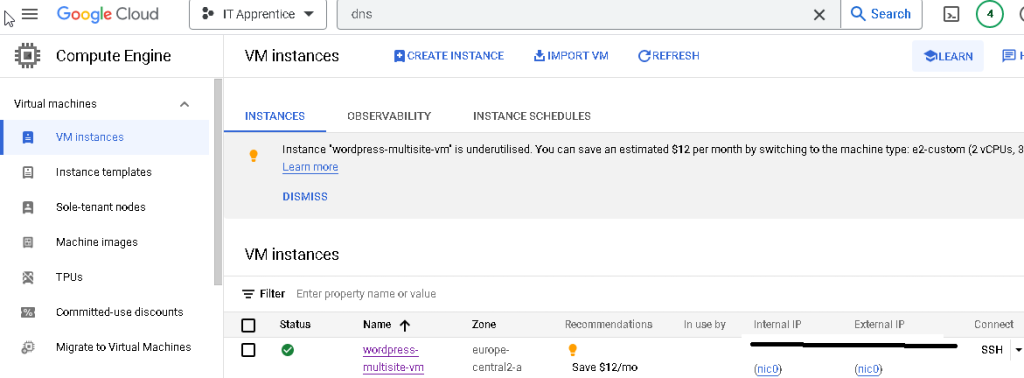
The first step to managing your Linux server in Google Cloud Console is to view your compute engine and virtual machine (VM) instance. To view your compute engine, log in to your Google Cloud Console account and navigate to the Compute Engine section.
Once setup, you will be able to view your Compute Engine and VM Instance!

The compute engine is the foundation of your server and serves as a place where you can host your applications and data.
From here, you can view a list of your VMs and their current status. By clicking on a specific VM, you can access its detailed information, including its IP address, machine type, and disk space usage.
Connecting to your server
There are several ways to connect to a Google Cloud virtual machine:
- SSH: Secure Shell (SSH) is a popular protocol used to remotely access and manage servers. You can use SSH to connect to a Google Cloud virtual machine by using a terminal or a command-line interface (CLI) tool such as PuTTY on Windows or Terminal on macOS or Linux.
- Remote Desktop Protocol (RDP): RDP is a widely used protocol for remote desktop connections. It allows you to access the graphical interface of a virtual machine and use it as if you were physically present. You can connect to a Google Cloud virtual machine using RDP client tools such as Microsoft Remote Desktop.
- Cloud Console: Google Cloud Console is a web-based platform for managing Google Cloud services. You can use the console to connect to a virtual machine and access its command line interface through the Serial Console feature.
- Cloud Shell: Google Cloud Shell is an interactive shell environment that you can use to run administrative commands and manage resources in your Google Cloud account. You can use Cloud Shell to connect to a virtual machine and access its command line interface.
- External Tools: There are several third-party tools and plugins available that can help you connect to a Google Cloud virtual machine. Some popular tools include Bitvise SSH Client, Xshell, and NoMachine.
It’s important to note that before you can connect to a Google Cloud virtual machine, you’ll need to set up a firewall rule that allows incoming connections on the desired port. Additionally, you’ll need to know the IP address or hostname of the virtual machine, and you may need to provide credentials such as a username and password. You will also need to setup certificates within the Google Cloud SSL manager.
There are several important protocols and techniques that you should be familiar with when it comes to Linux server administration.
SSH (Secure Shell) is a secure protocol for accessing your server remotely. It allows you to log into your server from any location and perform tasks as if you were sitting at the console.
SFTP (Secure File Transfer Protocol) is a secure way to transfer files to and from your server. This is especially useful when you need to transfer sensitive information, such as passwords or confidential documents.
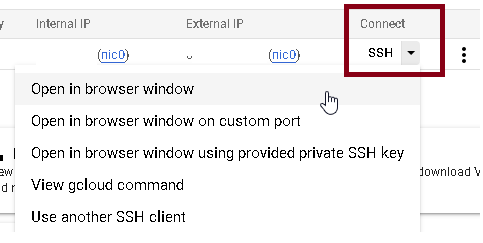
To connect on Google Cloud Console, go to VM instances and click the SSH option to the right on your Virtual Machine.
Other Tools to connect to your VM instance
- FileZilla
- WinSCP
By understanding the basics of setting up and managing a server, using important protocols and techniques, and being familiar with key tools and commands, you can become a skilled Linux server administrator.
Restarting Your Server
From time to time, you may need to restart your server to resolve issues or to apply updates. Restarting your server in Google Cloud Console is a straightforward process. Simply click on the desired VM and select the “Restart” button from the menu.
Restarting Apache server on a Google Cloud virtual machine (VM) can be a safe operation as long as proper precautions are taken. The Apache server, being an open-source web server software, can be restarted manually or automatically to improve the performance of your website.
There are different methods of restarting the Apache server on a Google Cloud VM, including using the command line interface or the Google Cloud Console. When restarting the Apache server, it is important to consider the impact on your website and services. To minimize any disruptions, it is advisable to restart the server during off-peak hours or to temporarily put your website in maintenance mode.
One of the benefits of using Google Cloud is its automatic restart service, which provides an added level of security for your website and services. In the event of a system failure or crash, the automatic restart service can quickly recover and restart your Apache server, ensuring that your website is up and running without interruption.
In the end, restarting the Apache server on a Google Cloud virtual machine can be a safe and efficient operation when done correctly. Whether it is a manual or automatic restart, it is important to consider the impact on your website and services and to plan accordingly.
Manage your instance with Cloud CLI
Additionally, you can also access the command-line interface (CLI) by using the Cloud Console to remotely connect to your server. This allows you to perform advanced administrative tasks and run scripts directly from the console.
Managing User Account Control for Linux Server Admins
As always in computer systems these days, managing user accounts is another important task for Linux server administrators. This includes creating new accounts, changing passwords, and setting permissions. This can be done using the command line interface or through a web-based graphical interface.
“Introduction to Linux Server Administration: Managing User Account Control for Linux Server Admins”
As a Linux server administrator, it’s important to understand the user account control system and the various tools available to manage user accounts. In this article, we will provide an introduction to user account control in Linux and show you how to use the most commonly used tools and commands for managing user accounts.
Managing User Accounts in Linux
Linux has a robust user account control system that allows administrators to create and manage user accounts. Each user account in Linux has a unique username and password, which are used to log in to the system.
The most commonly used tools for managing user accounts in Linux are the useradd, usermod, and userdel commands. These commands allow you to add, modify, and delete user accounts, respectively.
For example, the useradd command allows you to add a new user account to the system with a specific username and home directory. The syntax for the useradd command is as follows:
useradd [options] username
The usermod command allows you to modify an existing user account, such as changing the password or home directory. The syntax for the usermod command is as follows:
usermod [options] username
And the userdel command allows you to delete an existing user account from the system. The syntax for the userdel command is as follows:
userdel [options] username
Managing User Groups in Linux
In addition to managing individual user accounts, Linux also provides tools for managing user groups. A user group is a collection of user accounts that have similar permissions and access to resources on the system.
The most commonly used tools for managing user groups in Linux are the groupadd, groupmod, and groupdel commands. These commands allow you to add, modify, and delete user groups, respectively.
For example, the groupadd command allows you to add a new user group to the system with a specific group name. The syntax for the groupadd command is as follows:
groupadd [options] groupname
The groupmod command allows you to modify an existing user group, such as changing the group name or adding new members to the group. The syntax for the groupmod command is as follows:
groupmod [options] groupname
And the groupdel command allows you to delete an existing user group from the system. The syntax for the groupdel command is as follows:
groupdel [options] groupname
In this section, we have provided an introduction to user account control in Linux and shown you how to use the most commonly used tools and commands for managing user accounts and user groups. By mastering these tools and commands, you will be able to effectively manage user accounts and ensure the security and privacy of your Linux server.
Maximizing Website Performance with Google Cloud Console: A Beginner’s Guide to Event Logs, Agents and Observability Tool
Performance tuning is another important aspect of server administration. This includes monitoring your server’s resources, such as CPU and memory usage, and making adjustments as needed to ensure optimal performance. Tools such as top, htop, and iotop can be used to monitor your server’s performance.
As a website administrator, you’re responsible for ensuring your website’s uptime and stability. The Google Cloud Console is a powerful tool that can help you achieve that goal. With its comprehensive set of observability tools, you can easily identify and resolve any issues that may arise with your webserver. In this article, we’ll explore the various tools available to you in the Google Cloud Console and show you how to effectively use them to keep your website running smoothly.
Event Logs
One of the key features of the Google Cloud Console is its ability to collect event logs from various sources. This allows you to easily identify and diagnose issues with your webserver. In the Cloud Console, you can view logs from your compute engine, network, storage, and other sources. The logs are stored in a centralized location, making it simple to search and filter for the information you need.
You can really drill down into process utilization in real time – for instance: these tools allow me to check my websites performance and availability.
Viewing linux server logs can be Error logging and more

Agents
In addition to event logs, the Google Cloud Console provides access to agents that can help you troubleshoot issues with your webserver. These agents are installed on your virtual machine and collect information about the performance and health of your website. With this information, you can quickly identify and resolve any issues that may arise.
Observability Tools
Another great feature of the Google Cloud Console is its set of observability tools. These tools allow you to visualize and analyze the performance of your webserver in real-time. With these tools, you can easily identify any performance bottlenecks and resolve them before they become a problem.
Troubleshooting
The Google Cloud Console provides a wealth of information that can help you troubleshoot issues with your webserver. With its event logs, agents, and observability tools, you’ll be able to quickly identify and resolve any issues that may arise. Whether you’re an experienced administrator or just starting out, the Google Cloud Console is an essential tool for managing your webserver.
In conclusion, the Google Cloud Console is an essential tool for website administrators looking to maximize the performance and stability of their website. With its comprehensive set of event logs, agents, and observability tools, you’ll be able to easily identify and resolve any issues that may arise with your webserver. Whether you’re an experienced administrator or just starting out, the Google Cloud Console is a must-have tool for managing your webserver in the cloud.”
You can really drill down into process utilization in real time – for instance: these tools allow me to check my websites performance and availability.
Viewing linux server logs can be Error logging and more
In this blog post, we have provided an introduction to Linux server administration, including tips on setting up and securing your server, as well as best practices for performance tuning.
Additionally, we have covered Managing your Linux server in Google Cloud Console for Debian Linux WordPress is a powerful solution that provides you with the tools to maintain a fast, secure, and reliable hosting environment.
Whether you’re a seasoned administrator or just starting out, Google Cloud Console is an intuitive platform that can help you unlock the full potential of your WordPress site.
So why wait? Start managing your Linux server today and take the first step to a better hosting experience!
As you gain more experience, you will become more proficient in managing your servers and will be able to handle more complex tasks 🙂
Join Our Community!
🌟 Get exclusive insights and the latest IT tools and scripts, straight to your inbox.
🔒 We respect your privacy. Unsubscribe at any time.