Welcome to TheITApprentice.com's WordPress Plugin Dev Guide!
In this series, you'll become familiar with a LAMP stack, perform Linux commands, and learn how Web Development works. By mastering WordPress plugin development, you'll gain valuable skills for exciting opportunities.
This Guide Covers:
- Setting up a WordPress dev environment using Oracle VirtualBox and Bitnami
- Debugging, file management, and efficient code structures
- Best practices for secure, performant, and user-friendly WordPress plugins
- Packaging and distributing your plugins to the community
Technologies Covered:
- Oracle VirtualBox for virtual dev environment
- LAMP stack (Linux, Apache, MySQL, PHP) for web development
After Completing This Guide:
- Create and customize WordPress plugins to extend website functionality
- Troubleshoot and debug WordPress issues
- Optimize plugin performance and security
- Contribute to the WordPress community by sharing your plugins
- Explore freelance opportunities or start your own plugin dev business
(see our guide series below)
- How to Create a Simple WordPress Plugin | 2024
- Designing Plugin Architecture for WordPress: Learn the fundamentals of efficient plugin structure to enhance your development process.
- Securely Coding for WordPress Plugins: Dive into best practices for security, ensuring your plugins are safe from common vulnerabilities.
- Troubleshooting Bitnami VM Appliance 101: Get essential tips and tricks to navigate common issues with the Bitnami VM setup.
- Effective Plugin Code Generation: Streamline your coding with tools and techniques that speed up plugin development.
- Advanced Topics in Plugin Development:
- Working with SQL in Plugins: Explore how to safely integrate SQL into your plugins.
- Java for WordPress Plugins: Uncover the benefits and methods of incorporating Java into your plugin development.
- PHP and MySQL Security Considerations: Learn crucial security measures to protect your data and code.
- Real-world Examples and Case Studies: Gain insights from experienced developers who are shaping the future of WordPress plugins.
So anyway, let's continue and setup the WodPress Plugin Dev's Test Environment by following step-by-step here!
- Step-by-Step WordPress Development Setup
- Step 1: Install VirtualBox
- Step 2: Download and Import the Bitnami WordPress Image
- Step 3: Access and Configure WordPress
- Step 4: Enable Debugging and Log Errors for WordPress Plugin Dev
- Step 5: Set Up Shared Folders for Easy File Transfers
- Step 6: Snapshot Before Making Changes
- Step 7: Create WordPress Plugin Code Structures
- Step 8: Packaging Your Plugin
Step-by-Step WordPress Development Setup
Step 1: Install VirtualBox
- Download the setup file VirtualBox (Click to Download)
- You may need to install the pre-requisite Visual C++ Redistributable for this application to run the setup!
https://aka.ms/vs/17/release/vc_redist.x64.exe - Once downloaded, proceed to install VirtualBox on your computer, following the installation prompts.
Step 2: Download and Import the WordPress Image
- Download the WordPress VM image for VirtualBox (.ova file). Click to Download
- Open VirtualBox, navigate to "File" > "Import Appliance," and select the downloaded .ova file to import.
Step 3: Access and Configure WordPress
To begin using your WordPress installation on a virtual machine via Oracle VirtualBox, you need to start the virtual machine and configure access to the WordPress site. Follow these key steps:
Start your VM in Oracle VirtualBox.
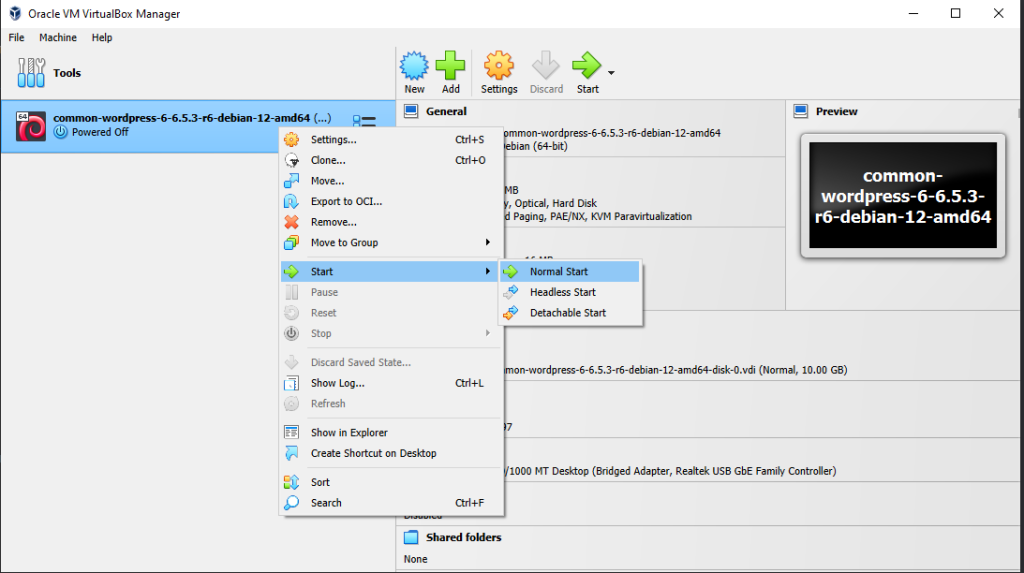
Once the VM is operational, observe and note the IP address displayed in the console. As mentioned, you will need this address in your web browser to access your WordPress site.
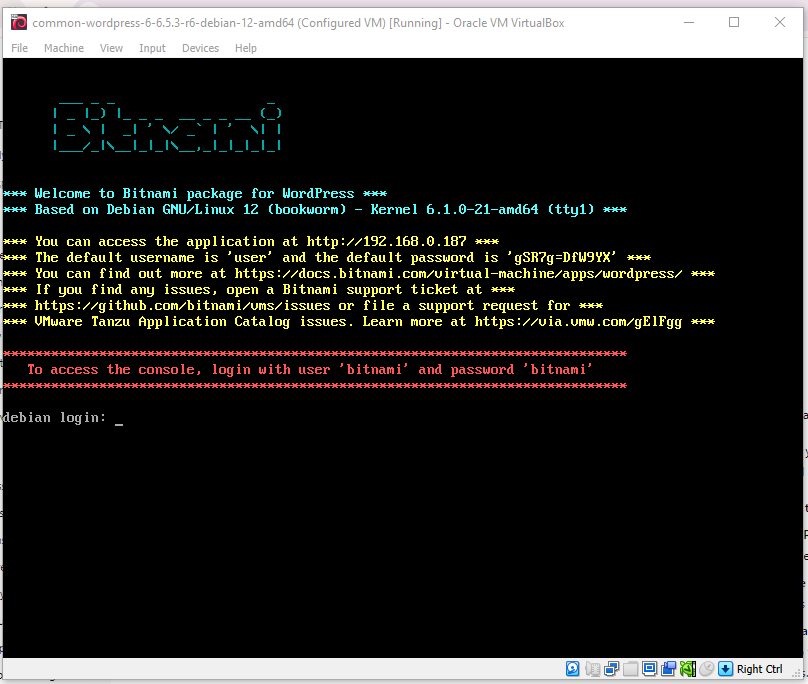
Enter the noted IP address into your web browser to visit your WordPress site.
Use the default username and password provided during the first boot by Bitnami to log into the virtual machine. If you've changed these details previously, use your updated credentials.
First, you will need to log into the virtual machine, so note the default username and password (unless you've changed that already).
Username: bitnami - Password: bitnami
Use the IP address to access the WordPress web interface externally.
From the screenshot above, you can see that my machine is accessible on http://192.168.0.187 - you can get to the WordPress Admin Panel - your IP will be different from this, please do not copy my URL!
If you've lost your login details, you have the option to either initiate a new VM or consult the Bitnami documentation for recovery instructions at Bitnami Documentation.
To access the Debian CLI console, log in using the credentials displayed in the red text above.
Step 4: Enable Debugging and Log Errors for WordPress Plugin Dev
We then need to further navigate using the Linux terminal to the WordPress installation folder to configure the WordPress Configuration File. This is in order to enable debugging and also add a line of text to define a WordPress Debugging Log parameter and set it to True. Without this, we will struggle to troubleshoot the PHP errors and Catastrophic Failures when attempting to upload or test our WordPress Plugin projects.
To enable debugging, from your virtual machine's terminal, enter the following commands:
Firstly, go into the root of the terminal by entering:
cd ../../
cd opt/bitnami/wordpress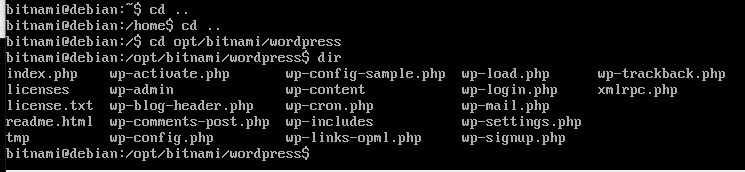
Open the wp-config.php file and set WP_DEBUG to true.
To do this, we'll need to use the admin privilege command (which in Linux is "sudo") and the built-in text editor of Linux, which is called "Nano".
sudo nano wp-config.php
This will then open the configuration file for WordPress, which we then need to add some more text to.
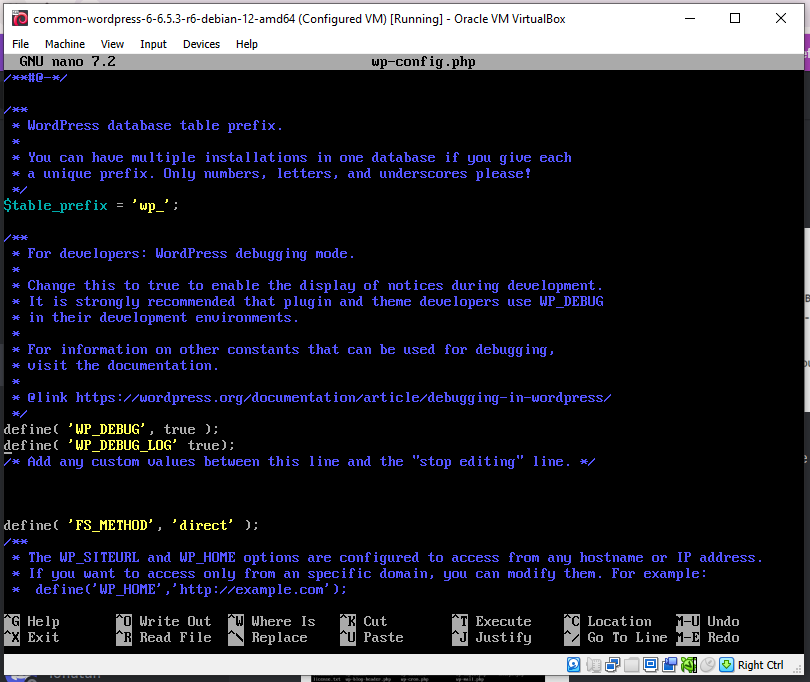
Scroll down the text file using the arrow keys of your laptop, find the following text:
Add define( 'WP_DEBUG', false); <---- change that to true.You now need to enter some new text in a line below, copy this or type out manually:
Add define( 'WP_DEBUG_LOG', true);Not quite finished yet in the text editor. Don't forget to save the changes; this is achieved by the use of keyboard commands:
CTRL+O to save and then CTRL+X to quit.
To initiate log generation, your Linux server will require either a complete restart or a manual service restart. Additionally, you should upload a plugin—preferably one that is known to generate errors—to facilitate the creation of log entries. Ensure that you complete Step 5 before rebooting your system.
Step 5: Complete the preparations for log generation and ensure everything is set up correctly. This step is crucial before moving forward with creating a restore point in step 6.
Step 5: Methods to Obtain the Debug Log File
There are multiple approaches to retrieve the debug log file generated by WordPress when debugging is enabled.
We recommend Method 1, as it has been thoroughly tested and endorsed by our volunteer team. It is not necessary to implement multiple methods; one reliable method is sufficient.
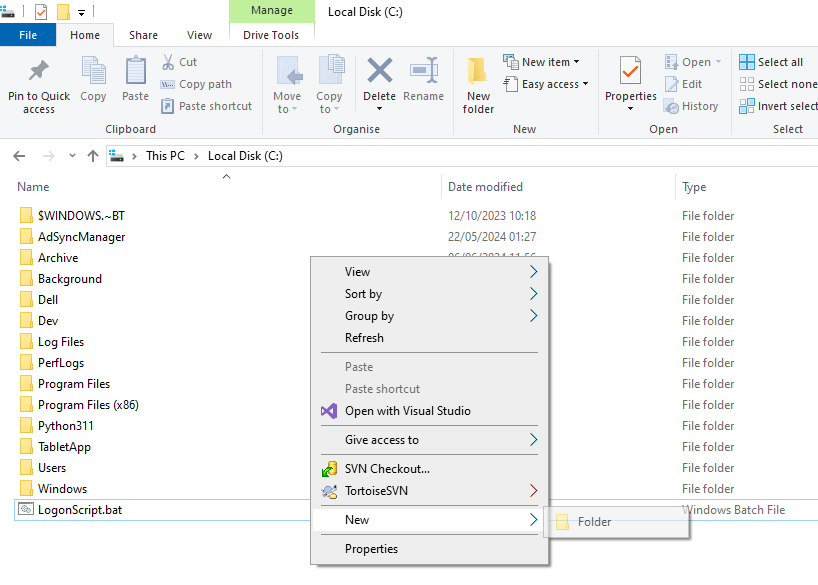
Part 1: Setup the C:\Shared Files folder on the root of C:
- Choose or Create a Folder to Share:
- Select an existing folder or create a new one where you will store the files you want to share. For instance, you could use
C:\SharedFiles.
- Select an existing folder or create a new one where you will store the files you want to share. For instance, you could use
Part 2: Configuring Shared Folder access
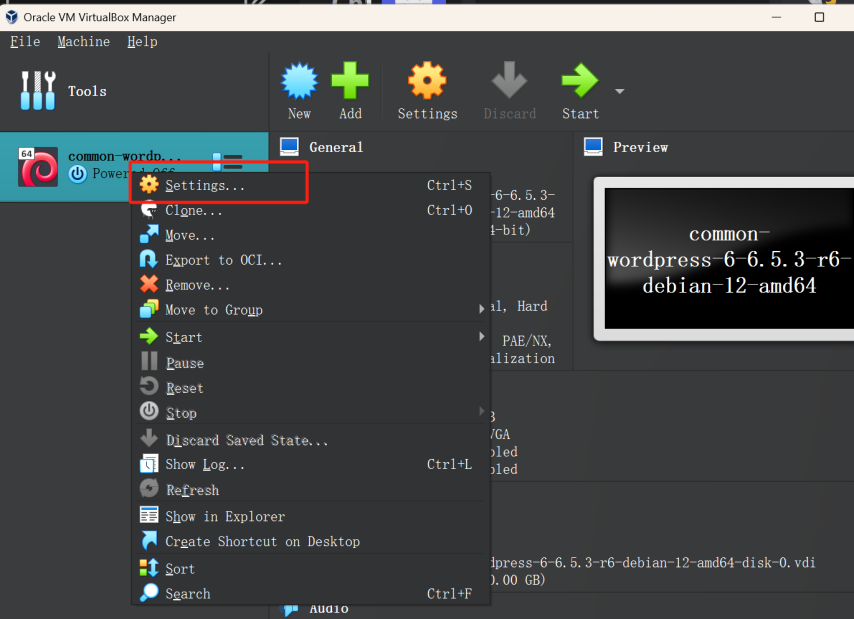
- Open VirtualBox and Navigate to Settings > Shared Folders
- Open VirtualBox, right click the Virtual Appliance and enter Settings
- From the left panel, select Shared Folders, then click Add Share
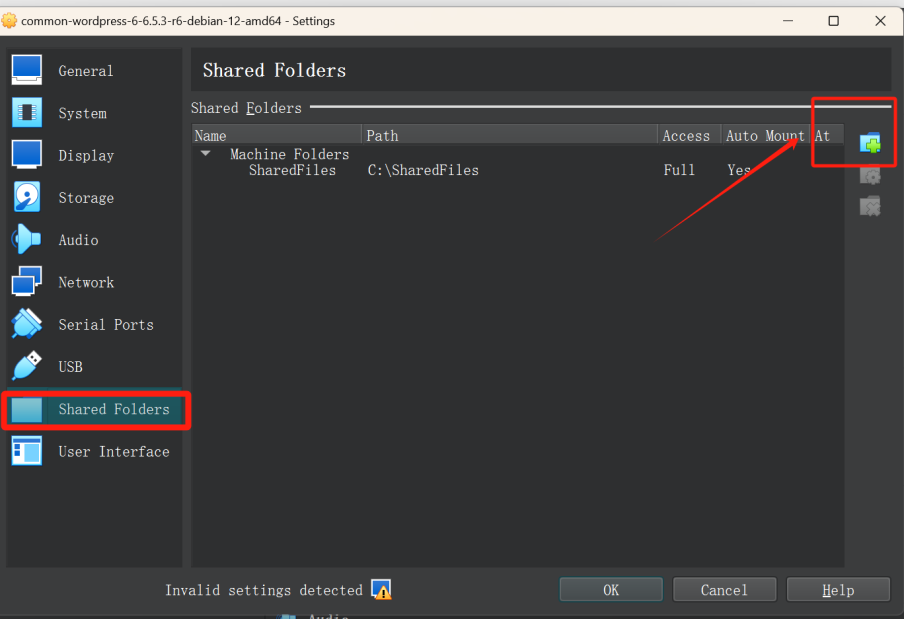
2. Add the Shared Folder from the Root of C:\ to Oracle VirtualBox:
- In the Add Share dialogue, enter the path to the C:\ drive
- In my case, the shared folder is c:\SharedFiles. ensure Auto-mount is ticked - do not mount this as a read only share - and click OK
Part 3: Mount the Shared Folder on Debian (Linux) to your Windows Host
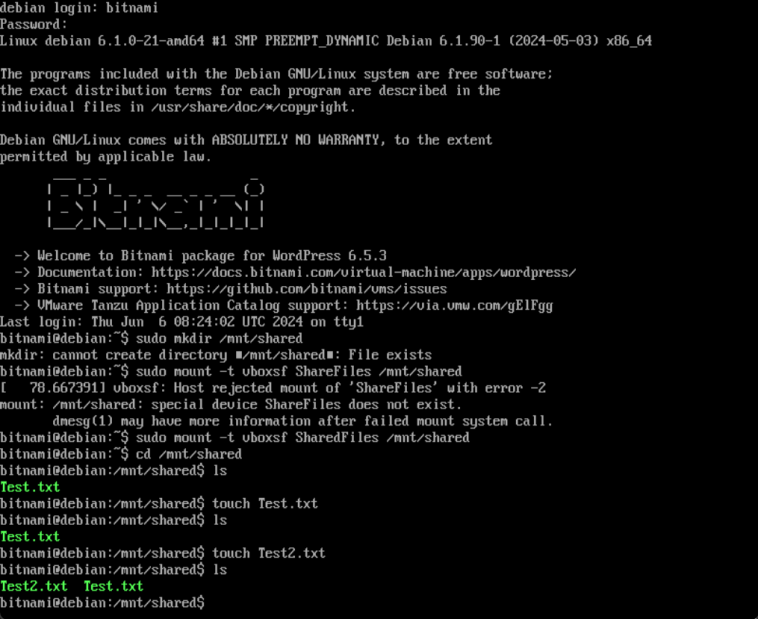
- Create a Mounting Point in Debian CLI:
- From the Terminal, type the following command to create the mount:
sudo mkdir /mnt/shared
- From the Terminal, type the following command to create the mount:
- Connect the Mount Point to the Local Folder on Windows
- Mount the shared folder in your Debian system. You can create a new directory for this and create the mount file with Admin Privilleges:
sudo mount -t vboxsf SharedFiles /mnt/shared
- Mount the shared folder in your Debian system. You can create a new directory for this and create the mount file with Admin Privilleges:
Part 3: Connection Test from the Debian guest to Windows Host
To test the connectoin from the Debian guest to Windows Host, we can do the following.
- Create a file on the mount point within Debian (Linux - guest):
- Ensure that you're in the mounted directory, so first of all: cd /mnt/shared
- Create a test file in the mount point directory, type: touch test.txt
- Ensure that you're in the mounted directory, so first of all: cd /mnt/shared
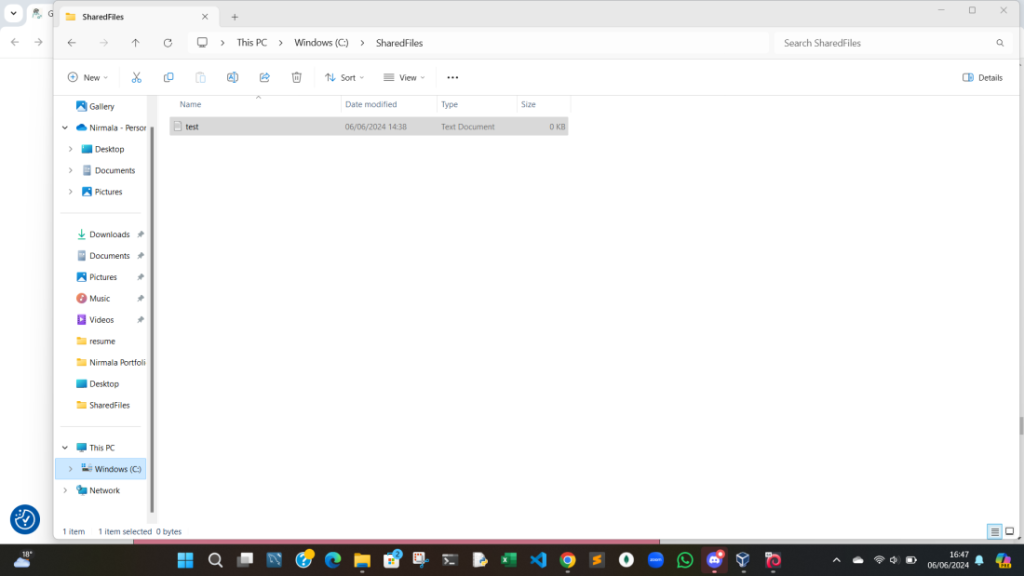
- Confirm in C:\SharedFolder that Test.txt has bene created
- Brose in File Explorer to the path above and confirm if the text file is present.
A Screenshot of test confirmation (in Linux / Debian - Thanks To Our Volunteer: Ruowei
A screenshot of the test confirmation (in Windows) - Thanks To Our Volunteer: Nirmala
Once completed. Go to Step 6. Unless you want to enable another method e.g SSH
Part 1: Accessing the Network Share from Debian VM
- Install Required Packages:
- Open a terminal in Debian and install the necessary packages to support network file sharing:
sudo apt update sudo apt install cifs-utils
- Open a terminal in Debian and install the necessary packages to support network file sharing:
- Create a Mount Point:
- Decide where you want to mount the shared folder in your Debian system. You can create a new directory for this:
sudo mkdir /mnt/sharedfiles
- Decide where you want to mount the shared folder in your Debian system. You can create a new directory for this:
- Mount the Network Share:
- Use the following command to mount the network share to the mount point you created. Replace placeholders with actual values:
sudo mount -t cifs //YourPCName/SharedFiles /mnt/sharedfiles -o username=your_windows_username,password=your_password,dom=your_domain - Replace
YourPCNamewith the name of your Windows machine. username,password, anddom(domain) should be replaced with your Windows credentials. If you're not on a domain, you might omit thedomparameter.
e.g. username@domain.local // or Domain/Username
- Use the following command to mount the network share to the mount point you created. Replace placeholders with actual values:
- Verify the Mount:
- Check if the folder is mounted correctly by listing the contents:
ls /mnt/sharedfiles
- Check if the folder is mounted correctly by listing the contents:
- Set Up Persistent Mounting (Optional): - you will want to have this on
- If you want the share to be mounted automatically at boot, you can add it to the
/etc/fstabfile:arduino//YourPCName/SharedFiles /mnt/sharedfiles cifs username=your_windows_username,password=your_password,dom=your_domain 0 0 - Make sure to replace placeholders as before. This step is optional but useful for ongoing projects.
- If you want the share to be mounted automatically at boot, you can add it to the
(credit to Volunteer: 'Oluwagbemiga Taiwo' for testing this method)
Activating and Connecting to SSH on Bitnami Machines
Step 1: Activate SSH By default, SSH is disabled on Bitnami machines. To activate SSH, follow the instructions in the Bitnami documentation: https://docs.bitnami.com/virtual-machine/faq/get-started/enable-ssh/
Step 2: Choose an Authentication Method You have two options for authentication when connecting to your Bitnami machine via SSH:
Method A: Password-based Authentication (Recommended for beginners) This method is simpler and suitable for local machine deployments. Follow the instructions in the Bitnami documentation to enable password-based SSH authentication: https://docs.bitnami.com/virtual-machine/faq/get-started/enable-ssh-password/
Method B: Key-based Authentication (More secure, but complex setup) This method uses an RSA key system and is more secure. However, it involves a more complex setup process. If you prefer this method, follow the instructions in the Bitnami documentation to enable key-based SSH authentication: https://docs.bitnami.com/virtual-machine/faq/get-started/enable-ssh-keys/
Step 3: Connect to the Bitnami Machine via SSH
If you chose Method A (Password-based Authentication):
- Option 1: Use your host machine's terminal to connect to the Bitnami machine. Enter the password you use in the Debian console when prompted. Note that copy and paste functionality may not work unless you're using a Linux system, as it is enabled by default in the terminal.
- Option 2: Use an SSH client like PuTTY to connect to the Bitnami machine. This allows you to copy and paste from your host machine.
If you chose Method B (Key-based Authentication): Follow the instructions in the Bitnami documentation to connect to the server using SSH: https://docs.bitnami.com/virtual-machine/faq/get-started/connect-ssh/
Additional Notes:
- SSH is preferred by some users, especially when you have other virtual machines running that have access to the host machine. Reducing the attack surface is paramount for security.
- The key-based authentication method (Method B) has not been tested by the volunteer (Oluwagbemiga Taiwo) who provided this information.
Remember to refer to the Bitnami documentation for detailed instructions on activating and deactivating the SSH server, configuring authentication methods, and connecting to the server using SSH.
For an SFTP connection, the SSH step must be completed, and SFTP would work out of the box—at least it did for me using the password-based method since the server serves SSH and SFTP on port 22 by default. Base FTP is not connecting for me, but SFTP is allowed. This might be because the server is not listening on port 21 or possibly due to another deactivation from Bitnami's end. Documentation Link: https://docs.bitnami.com/general/apps/wordpress/administration/upload-files/(edited)
Step 6: Snapshot Before Making Changes
Before you start uploading plugins or themes, take a snapshot of your VM.

From the Virtual Machine Appliance window, go to the Toolbar, click into the Machine drop-down list, and select Take Snapshot. From there, enter a snapshot name and description. You can then safely return to this snapshot should you have any problems, allowing you to revert to a clean slate if something goes wrong.
Now lets prepare to break things 🔨
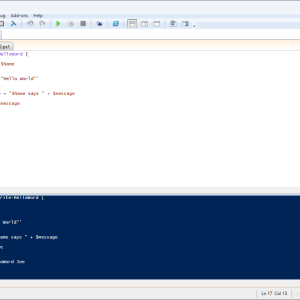
Step 7: Create WordPress Plugin Code Structures
In this step, we'll explore different approaches to creating the code structure for your WordPress plugin. You have several options:
- Write your own code from scratch
- Use AI to generate the code structure
- Use our example plugin and generate it yourself using PowerShell
Whichever approach you choose, it's essential to understand the fundamentals of creating a well-organized and maintainable code structure. If you're new to plugin development, we recommend starting with our example plugin and gradually exploring more advanced concepts.
Option 1: Write Your Own Code
If you prefer to write your own code from scratch, we encourage you to dive into our comprehensive guide on WordPress Plugin Architecture and Design. This tutorial covers essential topics like modular design, naming conventions, hooks and filters, file structure, object-oriented programming (OOP), security, and internationalization.
Option 2: Use AI to Generate Code
If you want to leverage the power of AI to generate your plugin's code structure, you can explore various AI-powered code generation tools. These tools can help you quickly create a basic plugin structure based on your requirements. However, it's crucial to review and customize the generated code to ensure it aligns with WordPress best practices and your specific needs.
Option 3: Use Our Example Plugin
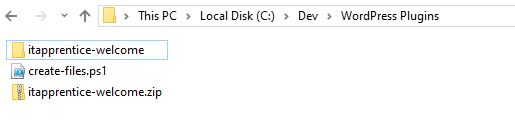
To help you get started quickly, we've provided an example plugin that you can generate using a PowerShell script. Follow these steps to create the basic plugin structure:
- Ensure that the
C:\Devdirectory and its subdirectoryWordPress Pluginsare created. - Open Notepad or any text editor, paste the PowerShell script code provided below, and save the file as
create-files.ps1in theC:\Dev\WordPress Pluginsdirectory. Make sure to select "All Files" from the save type menu to avoid saving it with a.txtextension.
[Paste your PowerShell script here]
- Open PowerShell and navigate to the
C:\Dev\WordPress Pluginsdirectory. - Run the script by typing
.\create-files.ps1and hitting enter.
After running the script, you'll have a basic plugin structure ready to go.
You can also find the full PowerShell script on Pastebin for easy copying.
Learning More About Plugin Code Structure
If you want to dive deeper into the world of WordPress plugin code structure and architecture, we recommend checking out our in-depth tutorial: WordPress Plugin Architecture and Design.
Additionally, you can watch our YouTube video that explores generating complex code structures:
Remember, creating a well-structured plugin is crucial for maintainability, scalability, and ease of collaboration. Take the time to explore different approaches and find the one that works best for you and your team.
Step 8: Packaging Your Plugin (before uploading)
When you're ready to distribute your plugin, create a ZIP file containing all the necessary files and directories. Include a readme.txt file providing information about your plugin, such as its name, description, version, author, and license.
Steps to Package Your Plugin:
- Include All Necessary Files: Ensure your plugin directory includes all the PHP files, any assets like CSS, JavaScript, images, and a
readme.txtfile. Thereadme.txtshould provide important information about your plugin, such as its name, description, version, author, and license. - Create a ZIP File:
A) Navigate to Your Plugin Directory: Go to the directory where your plugin files are located. (C:\Dev\WordPress Plugins)
B) Right-click on the Plugin Folder: Select the folder containing your plugin files.
C) Select "Send to" -> "Compressed (zipped) folder": This action will create a ZIP file with the same name as your plugin folder.

This will create a ZIP file of your plugin directory, ready for distribution.
Example of a readme.txt file:
=== IT Apprentice Welcome Message for Volunteers ===
Contributors: theitapprentice
Donate link: https://theitapprentice.com/donate
Tags: welcome, message, volunteers
Requires at least: 5.0
Tested up to: 5.8
Stable tag: 1.0
License: GPLv2 or later
License URI: https://www.gnu.org/licenses/gpl-2.0.html
== Description ==
This plugin displays a customized welcome message for TheITApprentice volunteers, with helpful links and commands.
== Installation ==
1. Upload `itapprentice-welcome.zip` to the `/wp-content/plugins/` directory.
2. Activate the plugin through the 'Plugins' menu in WordPress.
3. Go to 'Settings' > 'Volunteer Welcome Message' to customize the welcome message.
== Changelog ==
= 1.0 =
* Initial release.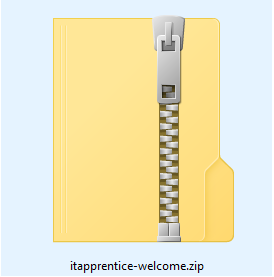
Are you too lazy to generate your own Plugin?
Good news, we've uploaded one here: Download IT Apprentice Welcome Plugin
Step 9: Uploading Your Plugin (to generate a log!)
To upload your plugin and start testing it in your WordPress development environment, follow these steps:
Don't forget where to go or where to look for the credentials, these are all shown when you power on the Bitnami VM

- Log in to your WordPress admin dashboard. e.g. 192.168.0.*
- Login with User and the Password as shown in your console
- Navigate to Plugins > Add New.
- Click on the Upload Plugin button at the top of the page.
- Choose the ZIP file of your plugin that you created in Step 8.
- Click Install Now.
- After the installation is complete, click Activate Plugin.
Your plugin is now installed and activated in your WordPress development environment. You can start testing its functionality and debugging any issues that arise. N
Step 10: Copying the Debug.Log File
Now that we have generated a log from the plugin upload, we need to familiarize ourselves with the commands to quickly copy over the debug.log file to the mount point on our Linux box, which allows file sharing to C:\SharedFiles.
Command to Copy Debug.Log File to Shared Folder
Enter the following command in your Linux terminal:
sudo cp /opt/bitnami/wordpress/wp-content/debug.log /mnt/sharedConfirm that the copy of the log file has landed in C:\SharedFiles.
Once the connection test is confirmed, we're now in a position to start coding and debugging. The shared folder setup allows for easy access to the debug.log file from both the Linux virtual machine and the Windows host machine.
FAQ / Troubleshooting
- What is the Recommended Methods to Obtain the Debug Log File?
Using local and remote folder sharing is an effective and straightforward approach for accessing the debug log file. It simplifies the process of retrieving the log file for analysis and troubleshooting. ✅ - I'm having trouble setting up shared folders. What could be the issue?
If you're encountering difficulties while setting up shared folders, it's possible that VirtualBox Guest Additions are not installed or properly configured. VirtualBox Guest Additions provide the necessary components for enabling shared folder functionality. However, if you're already using shared folders successfully, it's likely that VirtualBox Guest Additions are installed correctly on your virtual machine. - Why can't I copy and paste text from the Windows host to the VirtualBox appliance?
When working with a command-line interface (CLI) without a graphical user interface (GUI), tasks that rely on copy and paste functionality can be challenging. The absence of a GUI makes it difficult to seamlessly transfer text between the host and the virtual machine using traditional copy-paste methods. 😅 To overcome this limitation, consider alternative methods such as:- Using SSH or remote desktop protocols to establish a connection that supports copy-paste functionality.Utilizing shared folders to transfer text files between the host and the virtual machine.Employing command-line tools or scripts to automate the transfer of text or files between the environments.
While the lack of copy-paste support in CLI environments can be inconvenient, there are workarounds available to facilitate the exchange of information between the host and the virtual machine.
Support and Collaboration
As you begin crafting your own plugins or fine-tuning your WordPress site, remember that creativity and experimentation are not just permitted—they're encouraged! Should you run into any snags:
Join Our Discord Community: If you're experiencing issues or simply have questions, feel free to join our dedicated Discord channel. We are here to help troubleshoot and guide you through any challenges.
This direct support and collaboration are vital to our shared mission at TheITApprentice.com. We aim to build an effective and engaging Learning Management System (LMS) that enriches your learning experience. Whether you're facing difficulties, have suggestions, or want to get involved, our community is your resource. Dive in today and connect with our vibrant team of volunteers who are currently navigating the ins and outs of WordPress development. Your input and involvement can make a big difference!
Let's Keep Building Together, volunteer as a WordPress Plugin Dev for us
This development environment is more than just a playground—it's a launchpad for your burgeoning career in IT. By contributing to our Learning Management System, you're not only enhancing your skills but also creating valuable resources that will empower future IT professionals. Together, we're setting the stage for innovative, interactive learning experiences.
Every step you take at TheITApprentice.com is a crucial building block for your future in IT. Happy coding, and welcome to our vibrant community of IT innovators!
Exciting Topics Coming Up
Stay tuned as we delve deeper into WordPress Plugin Development with a series of follow-up blog posts designed to further enhance your skills and understanding:
- How to Create a Simple WordPress Plugin | 2024
- Designing Plugin Architecture for WordPress: Learn the fundamentals of efficient plugin structure to enhance your development process.
- Securely Coding for WordPress Plugins: Dive into best practices for security, ensuring your plugins are safe from common vulnerabilities.
- Troubleshooting Bitnami VM Appliance 101: Get essential tips and tricks to navigate common issues with the Bitnami VM setup.
- Effective Plugin Code Generation: Streamline your coding with tools and techniques that speed up plugin development.
- Advanced Topics in Plugin Development:
- Working with SQL in Plugins: Explore how to safely integrate SQL into your plugins.
- Java for WordPress Plugins: Uncover the benefits and methods of incorporating Java into your plugin development.
- PHP and MySQL Security Considerations: Learn crucial security measures to protect your data and code.
- Real-world Examples and Case Studies: Gain insights from experienced developers who are shaping the future of WordPress plugins.
Join Our Community!
🌟 Get exclusive insights and the latest IT tools and scripts, straight to your inbox.
🔒 We respect your privacy. Unsubscribe at any time.