How to Create a Simple WordPress Plugin | 2024
Discover the power of WordPress plugin development and learn how to create your own simple plugin in this interactive tutorial.
Introduction
WordPress plugins are a powerful way to extend the functionality of your website. In this tutorial, we’ll walk you through the process of creating a simple WordPress plugin from scratch. No prior plugin development experience is required!
Step 1: Set Up Your Development Environment
Before we begin, make sure you have the following set up:
- A local WordPress installation (e.g., using XAMPP, MAMP, or Local by Flywheel)
- A code editor (e.g., Visual Studio Code, Sublime Text, or Atom)
Once you have your development environment ready, let’s dive into creating our plugin!
Step 2: Create Your Plugin Files
Navigate to your WordPress plugins directory (usually wp-content/plugins/) and create a new folder for your plugin. For this tutorial, let’s call it my-simple-plugin.
Inside the my-simple-plugin folder, create a new file called my-simple-plugin.php. This will be the main file for your plugin.
Interactive Plugin Creation
Let’s make this tutorial more interactive! Use the form below to generate the basic structure of your plugin file:
Copy the generated code and paste it into your my-simple-plugin.php file.
Step 3: Add Your Plugin Functionality
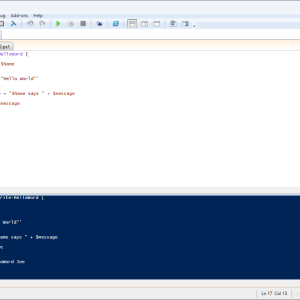
Now that you have the basic structure of your plugin file, it's time to add some functionality. For this tutorial, let's create a simple shortcode that displays a message.
Interactive Shortcode Creation
Use the form below to generate the code for your custom shortcode:
Copy the generated shortcode code and paste it into your my-simple-plugin.php file, below the plugin header comment.
Step 4: Activate Your Plugin
Your simple WordPress plugin is now ready! Follow these steps to activate it:
- Log in to your WordPress admin dashboard.
- Navigate to the Plugins page.
- Find your plugin in the list and click "Activate."
Congratulations! Your plugin is now active and ready to use.
Step 5: Test Your Plugin
To test your plugin, create a new post or page in your WordPress site and add the shortcode you created earlier. For example, if your shortcode name is my_message, add [my_message] to your post content.
Publish the post or page and view it on your site. You should see the message you defined in your shortcode displayed on the page.
Conclusion
You've just created a simple WordPress plugin! This is just the beginning of what you can accomplish with plugin development. As you continue to learn and explore, you'll be able to create more complex and feature-rich plugins to extend the functionality of your WordPress site.
Remember to always follow WordPress coding standards and best practices when developing plugins. This will ensure that your plugins are secure, efficient, and compatible with the latest versions of WordPress.
Happy plugin development, and may your code be bug-free and your sites be awesome!
Embark on Your WordPress Plugin Development Journey Today!
Now that you've learned how to create a simple WordPress plugin, it's time to put your newfound knowledge into practice. Start experimenting with more advanced features and functionalities to take your plugins to the next level.
Remember, the WordPress community is vast and supportive. Don't hesitate to reach out for help, advice, or inspiration as you continue your plugin development journey.
Take the Next Steps:
- Explore the WordPress Plugin Handbook for more in-depth guides and best practices.
- Join the WordPress plugin development community on WordPress.org forums and Stack Overflow.
- Challenge yourself to create a plugin that solves a specific problem or adds a unique feature to your site.
#WordPressPluginDevelopment #CustomPlugins #ExpandYourWordPressSite
Join Our Community!
🌟 Get exclusive insights and the latest IT tools and scripts, straight to your inbox.
🔒 We respect your privacy. Unsubscribe at any time.